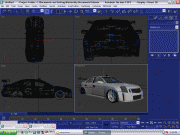
- 1
- 12] press H on your keyboard opening the parts list, and select all the parts excluding the vlo, wheel and dummies and delete them... which will leave you with a scene similar to the second image below
 ~
~  - 2
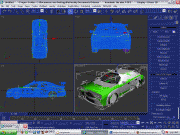
- 23] now select File+Merge, locate your model and merge the two scenes by selecting all on the bottom of the pop-up then ok - if you're presented with another pop-up, warning that two parts share the same names, check the apply to all duplicates box then hit the auto-rename button and you should end up with something similar to the last image shown below
 ~
~ 
 ~
~  - 3
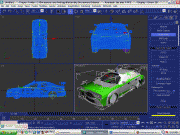
- 34] rotate your model 180 degrees (if need be), scale it and line it up with the vlo of the imported dff- making sure to use the bottom of the imported dff's wheel to line up the bottom of your models wheel
and as you can see, we will more than likely have to modify the col
but nvm that now-
 - 4
- 45] while all your parts are still selected, switch over to the utilities tab, depress the reset x-form button, scroll to the bottom of the CP and hit the reset selected button - then select the vlo, right click in a viewport and choose hide selected
 ~
~  - 5
- 56] select the original dff wheel and delete it - now tab over to your modifier panel -select any part- right click in the sub-object modifier window and select collapse all from the menu -repeat for each part-
 - 6
- 67] and... NOW attach your windows > select a door or the chassis, depress the attach button on the modifier CP, hit H on your keyboard, select the corresponding window and hit ok on the pop-up -repeat for each part/window-
 - 7
- 78] when you're done, select the bonnet_ok, tab over to the hierarchy panel, depress the affect pivot only button and move the parts axis to where you want it to rotate - now hit H on the keyboard and select the bonnet_dam - next, depress the align button, hit H again, highlight bonnet_ok, select pick then ok on the following pop-up
 ~
~  - 8
- 89] next, tab over to your modifier panel, hit H again, highlight bonnet_dummy and hit the select button - again depress the align button, hit H, select bonnet_ok from the list, hit pick and ok = viola! your bonnet dummy is now automagically aligned with both bonnets pivots>
 - 9
- 9-now repeat steps 8 and 9 for every part and it's corresponding dummy-
boot_ok + boot_dam = boot_dummy
wheel = wheel_rf_dummy
door_lf_ok + door_lf_dam = door_lf_dummy ect, ect-
10] after that's all done, you need to align the chassis axis to the chassis_dummy and car node (sentinel for me) - this is exactly like the above steps except you don't need to move the chassis pivot, you just let the align tool do it for you - so... tab over to your hierarchy panel, select affect pivot only, left click on the chassis (or select it by pressing H), hit the align button, then hit H and select chassis_dummy
 -b4
-b4  -after 10
done! next, select each dummy that does not have a corresponding part and move it to its appropriate position- in other words, select the exhaust dummy ("exhaust") and move it to the end of the tailpipe, same for the lights dummy ("headlights"), brake lights ("taillights"), ect.
if all goes well, the next step will be setting up the hierarchy which I'll be covering in the next tutorial... see ya there!
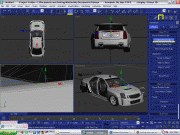
max shot of completed dummy/axis placement